Thursday, May 5, 2016

Rajour Aviator v2-C Headset project and a quick tip!


Over the past few days I have spent my spare time working on a cool project, designing and modeling this set of headphones. I learned a few things, like how to proceduraly generate the wrinkles in the leather padding.


Because the wrinkles are generated proceduraly based on vertex groups, I was able to keep the padding geometry very low for easy modification, unlike a sculpt where I would be limited to using proportional editing.

My method for making the wrinkles consisted of making a vertex group:


Now we will add a subdivision surface modifier, a displace, and then another sub-surf modifier. Set the texture coordinates to "Object" and add an empty and set it as the object. Scale along whichever axis is appropriate. Now just put the strength at .1 or less, and adjust the midlevel setting.


I hope that this gets you started, if you have any questions feel free to comment!

To see the complete project, visit my page on ArtStation!

Wednesday, April 20, 2016

Recent Projects

Over the past few months I have been working on several projects for a client, but I haven't had the time to share. So here are a few renders and a snippet about each:


Final Frontier

The Flares Wizard add-on helped show the intense brightness of the sun in this artwork

High-detail mesh modeled in 4 hours with the help of Hard Ops 7
This project Is still WIP, but has already been a blast to work on. Especially because I have been able to expand my skills in several areas by making everything from procedural planets, an entire solar system, and modeling a cool spaceship. Now I am in the animating stage, which is a little more challenging. Trying to get everything smooth and fluid will take some time.


Game Day


This was a fun project, took around 2 days to finish (the final product is animated and has some other back-end bits and pieces or it would have been less). I never made a stadium scene before, so it was a cool exercise. The Sunbeams node worked great for the stadium lighting.

----------------------------------------------------------------------------

Sadly I haven't had much time for personal projects recently, however I have some stuff in the works. It will probably take a lot longer to finish than I expect, as I only have around 1-2 hours per day to work on them, but we'll see.

Want to suggest a topic? Email me at noviceindisguise @gmail.com with Blog Subject: [your suggestion] in the subject line!

Wednesday, April 13, 2016

Hard Ops 007 Review

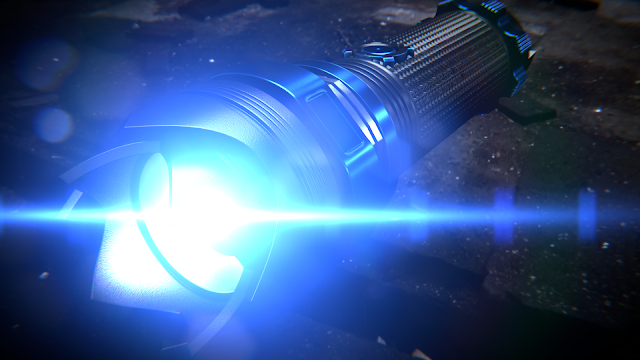
This is a tactical flashlight I made in 3 hours over the course of two evenings while getting used to Hard Ops

Recently I have had very little time to devote to personal projects, which has really bothered me. So I have made some changes to my schedule and organized my time usage more efficiently to make room for some personal Blender time. Over the past few days I have been spending that time getting used to the Hard Ops 007 add-on. My brief take-away is: It's awesome, and you should buy it. But let's go over why in a little more detail.

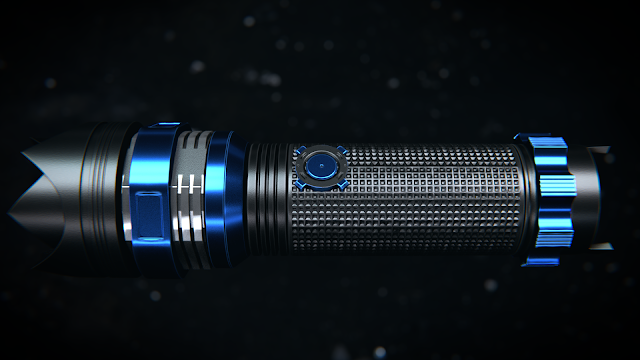
Hard Ops made this project much faster, and integrated seamlessly with my workflow

Pros:

 It saves you time

We all have heard the saying that time is money, but until you actually have a job and are working tight deadlines you don't fully understand how true it is. I found the tools contained within Hard Ops, and how it organized the Bool Tool and Loop Tools features was very useful. You can easily edit the menu key-mappings to fit your particular workflow, saving you time.

It introduces functionality

There are a number of really good features that either don't exist outside of or hard hard to find without this add-on, bringing a lot more tools to your workflow

Cons:

There is limited training

It may take you some time to get up to speed with the various features as the training is very limited. The creator of the add-on does have a series covering the basics, and I would seriously recommend giving them a watch, it will help you out a lot.

The price

I know a lot of the Blender community doesn't have the funds to justify a purchase like this unless they are employed using Blender, and the $15 could be a show-stopper for some of you, however I think that the add-on is reasonably priced for the content, and that if you are looking to do hard surface modeling in a remotely commercial way you should seriously consider making the investment.


Verdict

Like all other tools, this add-on won't all of a sudden make your results better, I'd be a fool to claim that. What it does do is add some more tools to your workflow, and gives you the ability to learn to make your workflow more efficient. Currently selling at $15, I think it is fairly priced. 

Let me know what you think in the comment section below.

Next week I will be doing a more artwork-based post. Also, would you guys like to see a series on 3D printing, from start to finish?

Monday, April 4, 2016

Speed Up The Compositor - Blender Optimization Tip

This week we will be looking at a way to optimize your renders in Blender with settings within the compositor. I have had good results with these features, but myself only discovered them recently when researching for just such a feature, so I thought I'd share it and help those of you who aren't aware of them a little bit. So without further ado,


The Compositor Performance Tab

This feature appears to be largely overlooked, but can make a big difference when rendering out an animation with a complex compositing nodetree. I found that I could regularly save well over a second per frame with the options in this tab, which adds up over longer projects. 


The two main options I used were the Chunk size, which acts very similarly to the tile size option in the render settings (hey devs, could you add an option to sync them?) and is a major part of this optimization technique. You want to use very similar values as with the render tile size,  with 32x32 or 64x64 for most CPUs and 256x256 to 512x512 for most GPUs. Just try rendering the same frame a few times on each and get an average and see what is best for your setup.

 The other option is OpenCL which can help a lot if you have a decent GPU, as it splits the workload on certain nodes and lets the GPU bear the brunt of certain calculations.

Notice: The render quality changed practically nothing, staying within the margin of error of .1 seconds through all levels. Changing these settings will probably have a negligible effect on all but the most complicated nodetrees.

Wednesday, March 30, 2016

Blender 2.77 - What's New


Well, Blender 2.77 came out a week ago, so I thought I'd make a compilation of all the new features that I really notice a lot and think will make a big splash. If you want to view the full release notes, you can visit the wiki page.

1. GPU Smoke Rendering

This has been the most requested feature from GPU users for the past several releases, and finally the devs hard work is ready. I made a quick review when the first release candidate came out with GPU support, and the results far exceeded my expectations. Contrary to some opinions voiced on various Blender forums leading up to this, GPU rendering on my GeForce GTX 980 leaves my Intel Core i7 (4 cores [8 threads] at 3.07 GHZ) in the dust. 


There is practically no comparison to be made. I think this is the single greatest addition to the Cycles render engine for many releases in the past, and will completely change the rendering accessibility of more complex simulations.

2. Cycles Point Density

Point density textures are now officially supported in the Cycles render engine. Using this new addition you can effectively make halo particles within Cycles as well as several other interesting effects.


3. Decimate is now Symmetry Aware

Now in 2.77 when you add the Decimate modifier it will try and keep the mesh symmetrical instead of the previous versions which would seem to give fairly random results. Personally I think it is high time a few modifiers got a new face. The most notable of these is the Boolean modifier, which leaves ugly geometry and has glitchy performance on unusual meshes. Currently users of the modifier are reduced to workarounds like using the Remesh Modifier below the Boolean modifier on the stack.


4. New Motion Blur Features

Some exciting new motion blur features were also introduced, allowing for a much greater degree of customization. Now not only do you have the standard shutter speed, but you can define a curve, and a top-bottom shutter to simulate rolling shutter when moving the camera quickly. I can't wait for some skilled animators to utilize these features, as I think they could add a bit more believability to a lot of productions in future.


Thanks for taking a read through this quick summary of the heavy hitters from this release, if you want to see the full release notes you can visit the 2.77 release wiki page

Thanks for stopping by, and I'll see you all next week!

Wednesday, March 23, 2016

Back to Blender

Recently I have had very little time for personal projects, but yesterday I took some time to experiment with a new add-on that I thought was quite interesting. The add-on is called CubeSter, and generates a 3D block mesh based on an image's colors and assigns vertex colors based on the original image. It appears to have a decent number of options to modify and will let you get some cool results.

Westward Expansion

Cosmos

Terra Firma

Paradise

Mars


This add-on is a great addition to my toolset, I can't wait to experiment with it further. I also am interested in taking a look into the code, looks like there could be some helpful techniques hidden in there.

Download the add-on here: CubeSter: Images to Geometry

Yep, I'm here again. Next week? We'll see.

Wednesday, March 16, 2016

Balance

It is amazing how hard it is to balance work and hobbies. Careful time management, squeaking every last minute out of your day, and still you don't know where it all goes. But there are very few things better than getting paid good money for good work, for doing something that you love to do.

Enjoy your work

This is so important, if you don't enjoy your job it will constantly seem like a chore, and hours will seem twice as long. For the past year or so I have been doing web development on the side, but I didn't enjoy it. I spent only a small portion of my workweek on it, but it still seemed like a tremendous chore. In contrast, recently I have been hired as a junior Motion Graphics artist for a content creation website, and it has been great. For the first time in the past 4+ years being able to make a living doing something I enjoy doing begins to seem possible. I don't so much mind the long hours and the crazy logistical juggling, because I am not just in it for the money. Which takes me to my next point.

Learn from your work

Sure you may be working professionally, but don't let that scare you off from trying new things. Gaining new skills in the field while actively working on a project is vastly more effective than learning it in a stale classroom environment. I have recently decided to start learning Python scripting and the specifics of BPY to help facilitate my projects, and already I have learned more than I had previously learned in my several attempts.

Let your work motivate you

I have found that working for an employer at an hourly rate has tremendously helped my efficiency. No more "quickly" checking social media and emails every 15-30 minutes, as now that time I was wasting has a tangible price tag. Instead I find myself more easily making the distinction in my life between work and life. All that is left is making sure I keep it balanced.


In the end, a balanced life is surprisingly subjective. Do you have friends/family that need attention? Do you have other responsibilities that you need to care for? How much leisure do you need to unwind to keep you from burning out? I think the only way to really find what balance is right, is to give it a shot, and make adjustments along the way. 


And so it continues. It is this week, and I'm still here. Next week? You bet.