Thursday, May 5, 2016

Rajour Aviator v2-C Headset project and a quick tip!


Over the past few days I have spent my spare time working on a cool project, designing and modeling this set of headphones. I learned a few things, like how to proceduraly generate the wrinkles in the leather padding.


Because the wrinkles are generated proceduraly based on vertex groups, I was able to keep the padding geometry very low for easy modification, unlike a sculpt where I would be limited to using proportional editing.

My method for making the wrinkles consisted of making a vertex group:


Now we will add a subdivision surface modifier, a displace, and then another sub-surf modifier. Set the texture coordinates to "Object" and add an empty and set it as the object. Scale along whichever axis is appropriate. Now just put the strength at .1 or less, and adjust the midlevel setting.


I hope that this gets you started, if you have any questions feel free to comment!

To see the complete project, visit my page on ArtStation!

Wednesday, April 20, 2016

Recent Projects

Over the past few months I have been working on several projects for a client, but I haven't had the time to share. So here are a few renders and a snippet about each:


Final Frontier

The Flares Wizard add-on helped show the intense brightness of the sun in this artwork

High-detail mesh modeled in 4 hours with the help of Hard Ops 7
This project Is still WIP, but has already been a blast to work on. Especially because I have been able to expand my skills in several areas by making everything from procedural planets, an entire solar system, and modeling a cool spaceship. Now I am in the animating stage, which is a little more challenging. Trying to get everything smooth and fluid will take some time.


Game Day


This was a fun project, took around 2 days to finish (the final product is animated and has some other back-end bits and pieces or it would have been less). I never made a stadium scene before, so it was a cool exercise. The Sunbeams node worked great for the stadium lighting.

----------------------------------------------------------------------------

Sadly I haven't had much time for personal projects recently, however I have some stuff in the works. It will probably take a lot longer to finish than I expect, as I only have around 1-2 hours per day to work on them, but we'll see.

Want to suggest a topic? Email me at noviceindisguise @gmail.com with Blog Subject: [your suggestion] in the subject line!

Wednesday, April 13, 2016

Hard Ops 007 Review

This is a tactical flashlight I made in 3 hours over the course of two evenings while getting used to Hard Ops

Recently I have had very little time to devote to personal projects, which has really bothered me. So I have made some changes to my schedule and organized my time usage more efficiently to make room for some personal Blender time. Over the past few days I have been spending that time getting used to the Hard Ops 007 add-on. My brief take-away is: It's awesome, and you should buy it. But let's go over why in a little more detail.

Hard Ops made this project much faster, and integrated seamlessly with my workflow

Pros:

 It saves you time

We all have heard the saying that time is money, but until you actually have a job and are working tight deadlines you don't fully understand how true it is. I found the tools contained within Hard Ops, and how it organized the Bool Tool and Loop Tools features was very useful. You can easily edit the menu key-mappings to fit your particular workflow, saving you time.

It introduces functionality

There are a number of really good features that either don't exist outside of or hard hard to find without this add-on, bringing a lot more tools to your workflow

Cons:

There is limited training

It may take you some time to get up to speed with the various features as the training is very limited. The creator of the add-on does have a series covering the basics, and I would seriously recommend giving them a watch, it will help you out a lot.

The price

I know a lot of the Blender community doesn't have the funds to justify a purchase like this unless they are employed using Blender, and the $15 could be a show-stopper for some of you, however I think that the add-on is reasonably priced for the content, and that if you are looking to do hard surface modeling in a remotely commercial way you should seriously consider making the investment.


Verdict

Like all other tools, this add-on won't all of a sudden make your results better, I'd be a fool to claim that. What it does do is add some more tools to your workflow, and gives you the ability to learn to make your workflow more efficient. Currently selling at $15, I think it is fairly priced. 

Let me know what you think in the comment section below.

Next week I will be doing a more artwork-based post. Also, would you guys like to see a series on 3D printing, from start to finish?

Monday, April 4, 2016

Speed Up The Compositor - Blender Optimization Tip

This week we will be looking at a way to optimize your renders in Blender with settings within the compositor. I have had good results with these features, but myself only discovered them recently when researching for just such a feature, so I thought I'd share it and help those of you who aren't aware of them a little bit. So without further ado,


The Compositor Performance Tab

This feature appears to be largely overlooked, but can make a big difference when rendering out an animation with a complex compositing nodetree. I found that I could regularly save well over a second per frame with the options in this tab, which adds up over longer projects. 


The two main options I used were the Chunk size, which acts very similarly to the tile size option in the render settings (hey devs, could you add an option to sync them?) and is a major part of this optimization technique. You want to use very similar values as with the render tile size,  with 32x32 or 64x64 for most CPUs and 256x256 to 512x512 for most GPUs. Just try rendering the same frame a few times on each and get an average and see what is best for your setup.

 The other option is OpenCL which can help a lot if you have a decent GPU, as it splits the workload on certain nodes and lets the GPU bear the brunt of certain calculations.

Notice: The render quality changed practically nothing, staying within the margin of error of .1 seconds through all levels. Changing these settings will probably have a negligible effect on all but the most complicated nodetrees.

Wednesday, March 30, 2016

Blender 2.77 - What's New


Well, Blender 2.77 came out a week ago, so I thought I'd make a compilation of all the new features that I really notice a lot and think will make a big splash. If you want to view the full release notes, you can visit the wiki page.

1. GPU Smoke Rendering

This has been the most requested feature from GPU users for the past several releases, and finally the devs hard work is ready. I made a quick review when the first release candidate came out with GPU support, and the results far exceeded my expectations. Contrary to some opinions voiced on various Blender forums leading up to this, GPU rendering on my GeForce GTX 980 leaves my Intel Core i7 (4 cores [8 threads] at 3.07 GHZ) in the dust. 


There is practically no comparison to be made. I think this is the single greatest addition to the Cycles render engine for many releases in the past, and will completely change the rendering accessibility of more complex simulations.

2. Cycles Point Density

Point density textures are now officially supported in the Cycles render engine. Using this new addition you can effectively make halo particles within Cycles as well as several other interesting effects.


3. Decimate is now Symmetry Aware

Now in 2.77 when you add the Decimate modifier it will try and keep the mesh symmetrical instead of the previous versions which would seem to give fairly random results. Personally I think it is high time a few modifiers got a new face. The most notable of these is the Boolean modifier, which leaves ugly geometry and has glitchy performance on unusual meshes. Currently users of the modifier are reduced to workarounds like using the Remesh Modifier below the Boolean modifier on the stack.


4. New Motion Blur Features

Some exciting new motion blur features were also introduced, allowing for a much greater degree of customization. Now not only do you have the standard shutter speed, but you can define a curve, and a top-bottom shutter to simulate rolling shutter when moving the camera quickly. I can't wait for some skilled animators to utilize these features, as I think they could add a bit more believability to a lot of productions in future.


Thanks for taking a read through this quick summary of the heavy hitters from this release, if you want to see the full release notes you can visit the 2.77 release wiki page

Thanks for stopping by, and I'll see you all next week!

Wednesday, March 23, 2016

Back to Blender

Recently I have had very little time for personal projects, but yesterday I took some time to experiment with a new add-on that I thought was quite interesting. The add-on is called CubeSter, and generates a 3D block mesh based on an image's colors and assigns vertex colors based on the original image. It appears to have a decent number of options to modify and will let you get some cool results.

Westward Expansion

Cosmos

Terra Firma

Paradise

Mars


This add-on is a great addition to my toolset, I can't wait to experiment with it further. I also am interested in taking a look into the code, looks like there could be some helpful techniques hidden in there.

Download the add-on here: CubeSter: Images to Geometry

Yep, I'm here again. Next week? We'll see.

Wednesday, March 16, 2016

Balance

It is amazing how hard it is to balance work and hobbies. Careful time management, squeaking every last minute out of your day, and still you don't know where it all goes. But there are very few things better than getting paid good money for good work, for doing something that you love to do.

Enjoy your work

This is so important, if you don't enjoy your job it will constantly seem like a chore, and hours will seem twice as long. For the past year or so I have been doing web development on the side, but I didn't enjoy it. I spent only a small portion of my workweek on it, but it still seemed like a tremendous chore. In contrast, recently I have been hired as a junior Motion Graphics artist for a content creation website, and it has been great. For the first time in the past 4+ years being able to make a living doing something I enjoy doing begins to seem possible. I don't so much mind the long hours and the crazy logistical juggling, because I am not just in it for the money. Which takes me to my next point.

Learn from your work

Sure you may be working professionally, but don't let that scare you off from trying new things. Gaining new skills in the field while actively working on a project is vastly more effective than learning it in a stale classroom environment. I have recently decided to start learning Python scripting and the specifics of BPY to help facilitate my projects, and already I have learned more than I had previously learned in my several attempts.

Let your work motivate you

I have found that working for an employer at an hourly rate has tremendously helped my efficiency. No more "quickly" checking social media and emails every 15-30 minutes, as now that time I was wasting has a tangible price tag. Instead I find myself more easily making the distinction in my life between work and life. All that is left is making sure I keep it balanced.


In the end, a balanced life is surprisingly subjective. Do you have friends/family that need attention? Do you have other responsibilities that you need to care for? How much leisure do you need to unwind to keep you from burning out? I think the only way to really find what balance is right, is to give it a shot, and make adjustments along the way. 


And so it continues. It is this week, and I'm still here. Next week? You bet.

Tuesday, March 8, 2016

Regularity

What is the most effective way to increase your output? I think that is regularity. Making something every week, no matter how busy or tired you are, no matter how little you want to do it.
I have to admit, this week is hard. I am flat out working towards a looming deadline, with several other work related checkpoints impending. But here I am. Writing a blog post.

In a way, it seems like I am trying to check off another thing on a list fast growing out of control, but then again, there is something more. I considered letting one week slip, maybe wait until the deadline is past, wait until things settle down again. But then I realized, you know, that is never going to happen. You give an inch, you give a mile. Before long the blog dies again, and with it, a precious little part of my week. So I started writing.

This post isn't about Blender, or art even specifically. It is about life. Time is precious, but so also are many other things, and if you don't spend a little of your invaluable time on them, they vanish. Balancing work and hobbies is tough, but I can tell you one thing. If you don't balance them, your job will do the balancing for you.

So maybe, take a few minutes this week. Do something you love, take a break. Life is only as good as you make it.

Next week, I'll be here.

Tuesday, March 1, 2016

AnimationMarch is underway!

Today is a big day! Animation March was just launched, and we are all scurrying to complete the first challenge, "Appearing Text". To view all the topics and more details, visit the event page here: https://agenzasbrothers.com/en/animationmarch-2016/


I will be posting my results on this blog, instead of the every Wednesday posts I have been doing. We will return to that schedule in April after this event is completed.

Wednesday, February 24, 2016

GPU vs. CPU - Blender Cycles Fire

The new 2.77 pre-release now has support for GPU rendering of smoke and fire, so I am going to put it to the test and see how it stacks up against CPU rendering in a variety of situations. Below are my specifications:

- NVIDIA GeForce GTX 980
- Intel Core i7 at 3.07 GHZ (8 threads)

I had been keeping up to speed on the subject, reading articles on BlenderArtists and such, and there were some objections raised that gave me concerns that GPU might be slower than CPU because of how the smoke was handled, but those fears were completely put to rest with the first test scene. My GPU got a very respectable time of 2:12.84  while the CPU  hit the three minute mark 25% of the way through, and only 1/3 of the way through the intensive portion.


I was also amazed at the relative viewport performance, as the GPU maintained a decent view at all times, while the CPU had major issues, sampling much slower and not updating as quickly. In this video you can see the comparison from GPU (first) to CPU (second). Note that this is also while using a GPU hardware based recording software.

Overall, I am extremely excited to see what will come of this latest extremely valuable addition to the Cycles render engine.

Wednesday, February 17, 2016

Getting inspiration for CG artowrk

One thing I get asked a lot, and see other people asked a lot is how do you get inspired, what makes it possible for you to make artwork like this? We will be going over a few general points, that should get you well on your way.


1. Real Life

It is easy with CG work to get artistically disconnected with the real world, retreating into the corners of the web where epic fantasy digital paintings and fantastic creatures reside. Places where reality, the real hard, meaningful parts of life are left behind. And because of this, the single most important part of storytelling. Relatability. 

The way to keep from making yet another generic scene, another generic character, is to give it soul, some taste of the real world the viewer can devour. A piece of a story, a narrative that is life. Because we can all relate with it, and powerfully. Take just a small, meaningful piece of your life and paint a picture around it. You will be amazed.

2. Other Art Disciplines

I find it amazingly inspiring to frequently view artworks made using different techniques, from photography, to painting, to carving, watchmaking, literally everything. Become fascinated with art for art's sake, and all your artworks will show the difference. 

Outside of Blender and the CG world, I am an avid photographer and videographer.
This is one of the most important aspects of being an artist. Having a wide and varied knowledge of many differing things gives you much more to draw inspiration from. You will find that the variety and complexity of your artworks flourishes. I am amazed how much a good knowledge of Photography and Videography are especially useful.

3. Just Make Something

I don't care how bad you are, or how awful it looks when completed. The things you will force yourself to learn by just doing something will stay with you and help you make your next artwork that much better. Never underestimate the power of practice. You never hear the story of all the failed attempts before the great successes of your favorite artists. 

When I started this project, I had no idea what I was going to make. I just started.
If you find yourself against a wall and literally can't think of anything to make, pick something on your desk. A pencil, a coin, a notepad; anything is good as another. This will get you started, and you might be surprised how much you can learn from it.

4. Always Keep Learning

No matter how long you have been working in the CG field, there is always something more you can learn. This may mean going out of your comfort zone and learning a new software package, learning scripting to help speed up your workflow, or any number of simpler things. 


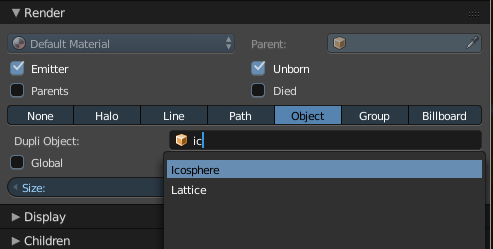
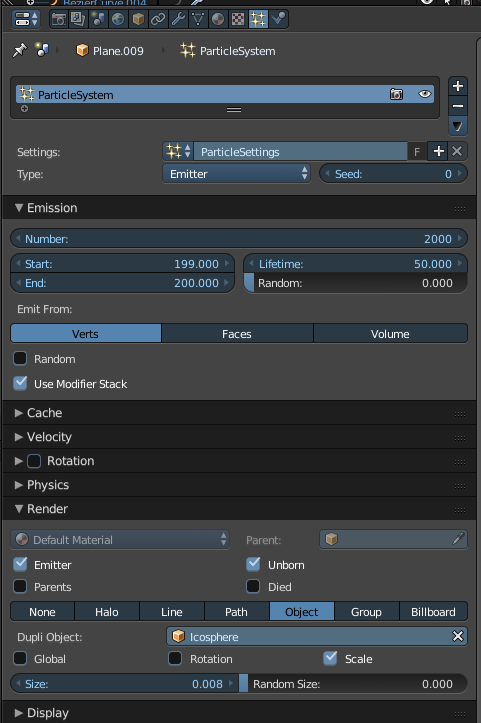
I learned a lot about instancing, material nodes, and modelling from this project.
Everyday there is something to learn from even your current projects. And if you are not learning anything from your current projects you should consider ramping it up. Unless you do not know how to do something in your project your project is too easy. Quite often after learning a new technique or finding a new addon, I will come up with a project idea based on that new found ability that I otherwise would have completely missed

5. Start Writing

I find that writing and drawing helps me formulate my ideas, and something as simple as an accidental stroke can make a tremendous difference in the final outcome of the project, and can lead to results I would have otherwise not come up with. Something about the physical act of writing and drawing seems to help engage the mind and get ideas flowing.


Never underestimate the value of good planning. You need to know how to allocate your time and resources before you even start or you will find yourself getting bogged down.

6. Stick With It

I know it is nice to "get inspired" and have a project you really like working on, but eventually that wears off. Don't forsake your old project that is near completion to one that you feel like you like more. Once you have passed the planning stage, and have made an effective plan, you should know if you can or cannot complete the project. This is the time to set it aside if you are going to at all. If you wait until you are halfway through the project you will find you never come back to it, instead you will have to start all over again as the part you made previously will not be up to your standard. 

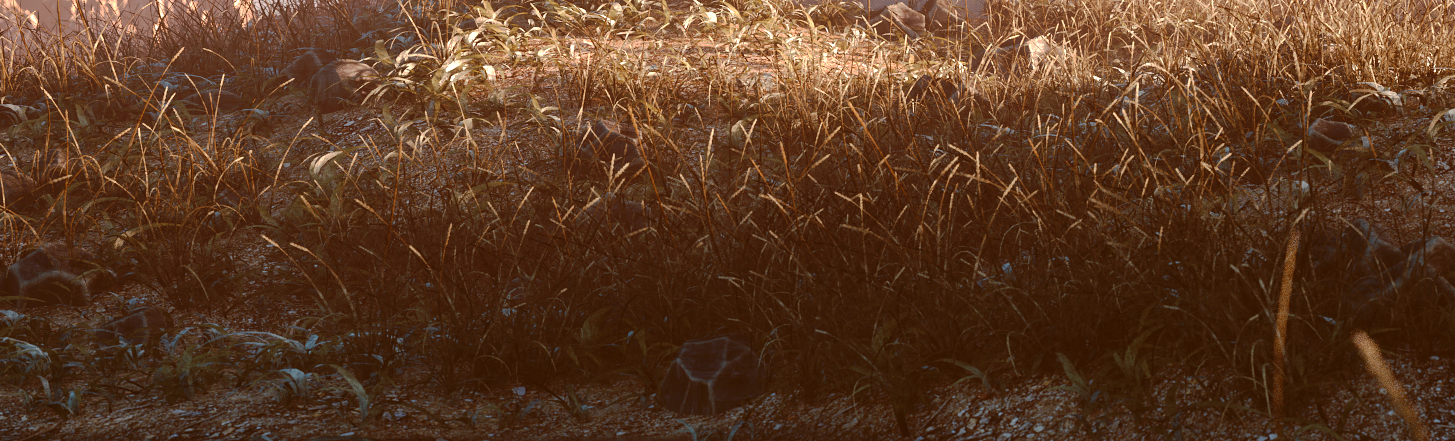
This image was inspired by spending morning breakfasts with my grandparents, looking out the kitchen window.
It helped me keep with the project and stay interested.
It is important to complete a project quickly or this starts to take effect. I can't tell you how many times I have read a post where someone, after over a year of work, has finally completed their project. They always mention how hard it was, because they kept wanting to go back and fix things, which ate up even more time. And eventually the fix will need to be fixed . . .  This is a really vicious cycle, but it doesn't need to be. You can usually decide if a project is too big or complex for you from the outset. The choice of will you or will you not on the other hand is a harder question. Just keep at it.  

7. Move

Get up, and go outside. Take a walk, and think. Ideas do not just show up. You have to chase them down.


--------------------------------------------------

I hope you guys enjoyed this, I know a lot of people have asked me about it. 
Please share if it has helped you :)


Wednesday, February 10, 2016

How to make an abstract polygonal wallpaper

This week I will be revisiting the techniques I used to create these artworks, and giving an overview of how to achieve this effect.

Main Concepts

One of the most critical parts of making an artwork like this is the lighting. You can use a set of lamps, or a good studio HDR. The important thing is to get a lot of contrasting light sources to give complex reflections and to add visual interest to otherwise solid polygons. 

To continue with the contrasting theme, we will also give the materials very contrasting colors. A high Depth of Field can also help add some more visual interest to the artwork.

Creating the Geometry 

1. Generating the base mesh

Start by adding a simple plane to your scene, and adding a Subdivision Surface modifier:


Next you will want to add a Decimate and a Displace modifier:


2. Creating the wire highlights

To do this, simply duplicate the mesh and move it upwards on the Z axis, and then add a Wireframe and Subdivision Surface modifier as shown (make sure to keep it below the displace modifier):

Make sure that 'Crease Edges' is checked

3. Adding the spheres at the joints

To do this we will just use a particle system set to emit from vertices and to show unborn particles. Start by adding a particle system and moving it up the modifier stack:


Now add an icosphere and go back to the particle system settings and add it as the duplication object:


Change the particle settings as shown:


Adding materials and camera setup


Now we will add basic glossy materials, position the camera in a good position, and render the image out. Remember to add some DoF as well. Feel free to add a sphere with a different color to add a focal point to the image if so desired:


Wednesday, February 3, 2016

The Observatory House - Photoreal Environment Study

 View on ArtStation

To kick things off, I will be returning to a recent project and giving a few more interesting details about it. My inspiration for this was trying to make an architectural structure out of a basic primitive. For this particular project I chose a UV Sphere.

Like all projects, I wish I could have kept at it a little longer, but hey, whatever. Anyways, what I did first is make the base terrain mesh. The terrain is made using a basic noise displacement with object coordinates so I could use an empty to move the texture so it looked about right.

After I made the base terrain, I started working on blocking objects (water, really simple house, etc) and adding fine details to the house. This was a lot of fun, and as you can see the UV Sphere really dictated how the final structure ended up looking.


The panels are intended to shield from extreme sunlight in the day to keep the interior cool, as this is intended to be a very hot, arid country. The lattice window was made using a mixture of the decimate and wireframe modifiers. That was a little tricky to get right.

Next I moved on to modelling the grass, which wasn't real hard, probably around 45 minutes to get all the bunches. Then I added the material, which I fine tuned over the course of the project. I then moved on to making some procedurally modeled rocks, utilizing voronoi displacement and a few other tricks.


The last main modelling stage was to make the mountains (using the ANT landscape addon) and the willow tree. Although a little unhappy with the quality of the tree, I guess it came out alright.

The compositing was fairly straightforward, one of the main things I did was use film emulation, which kind of inspired the final composite style.

------------------------------------------------------

If you would like to see an article on a specific project, please feel free to leave a comment below!

If you have a project or lead you would like to submit for review to be used in an upcoming article, please let me know as well.

Monday, February 1, 2016